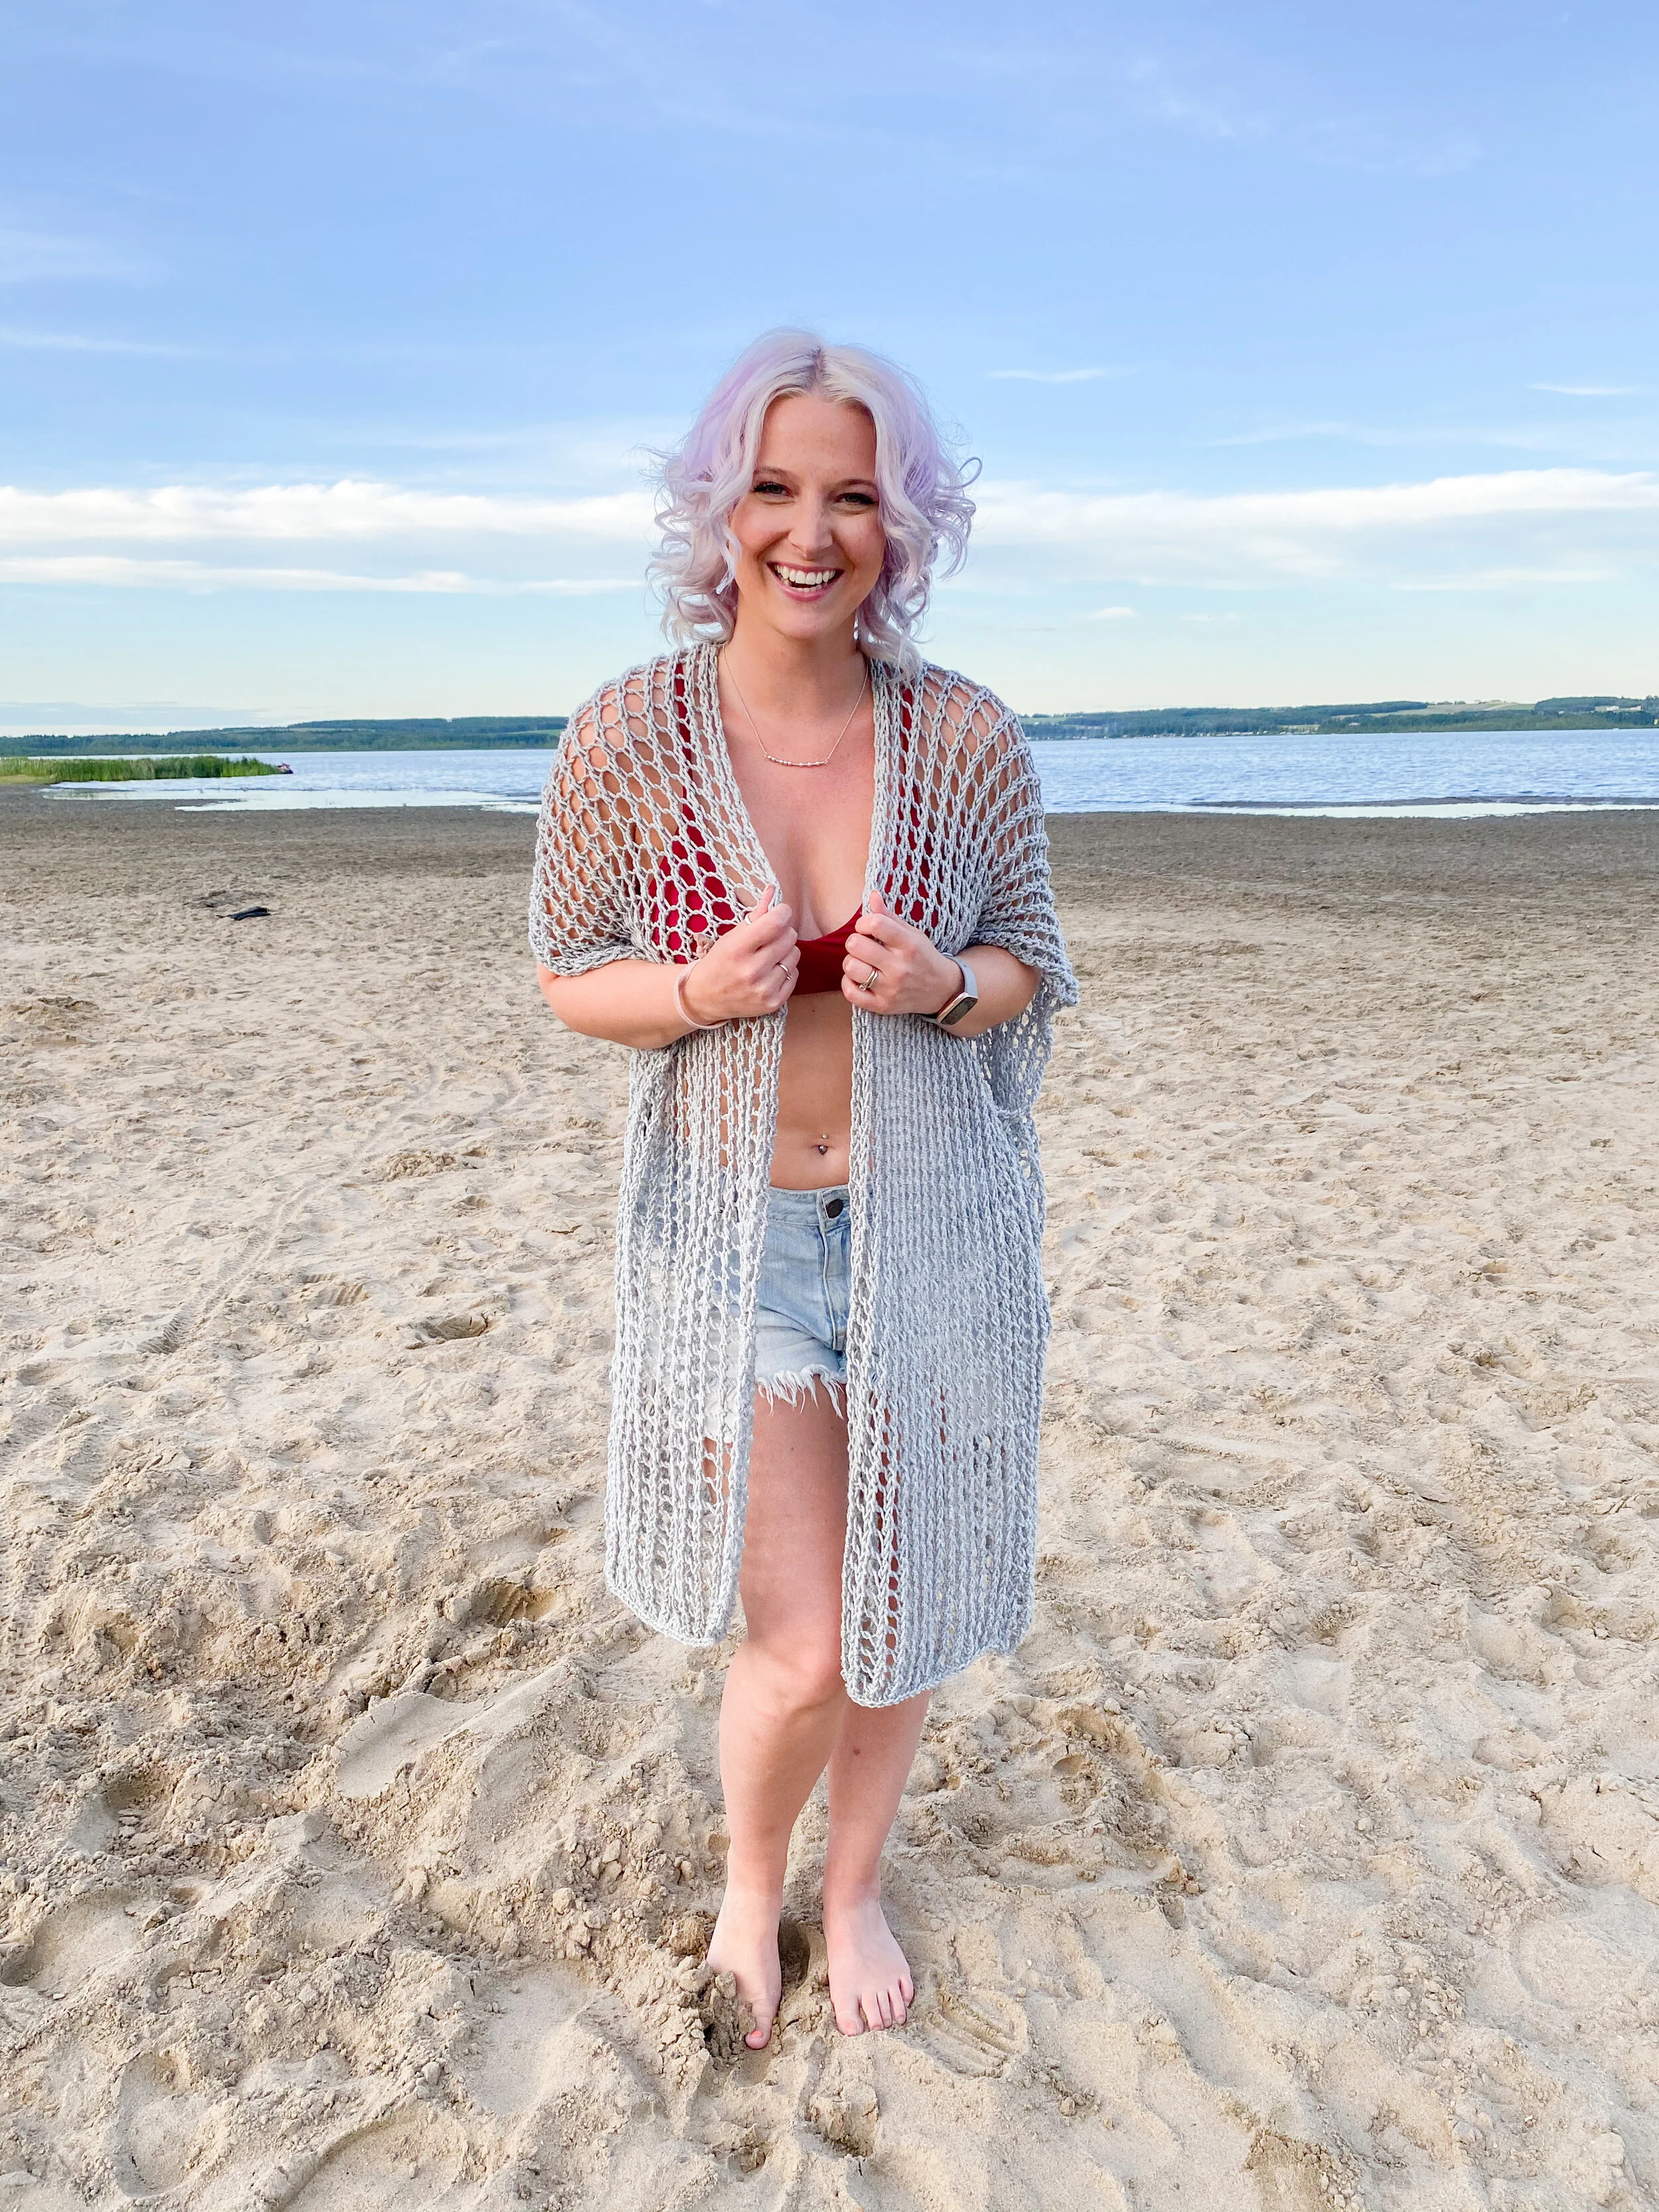
LAKESIDE BEACH WRAP - FREE KNITTING PATTERN
PIN IT NOW - SAVE IT FOR LATER
PURCHASE THE AD-FREE DOWNLOADABLE PDF HERE ON: RAVELRY, ETSY
Continue scrolling for the free written version of the pattern at the end of this blog post
Note that there are affiliate links in this blog post. Which means at no extra cost to you, I may receive monetary value should you make a purchase through them - in turn going to support Knitatude <3
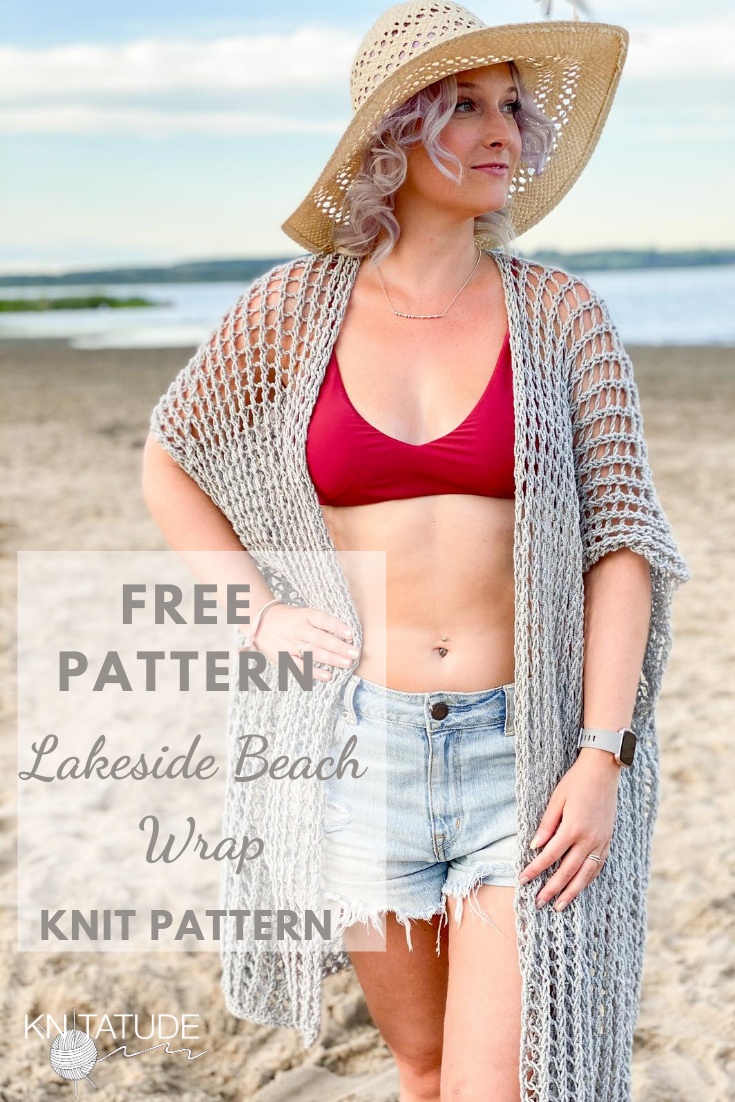
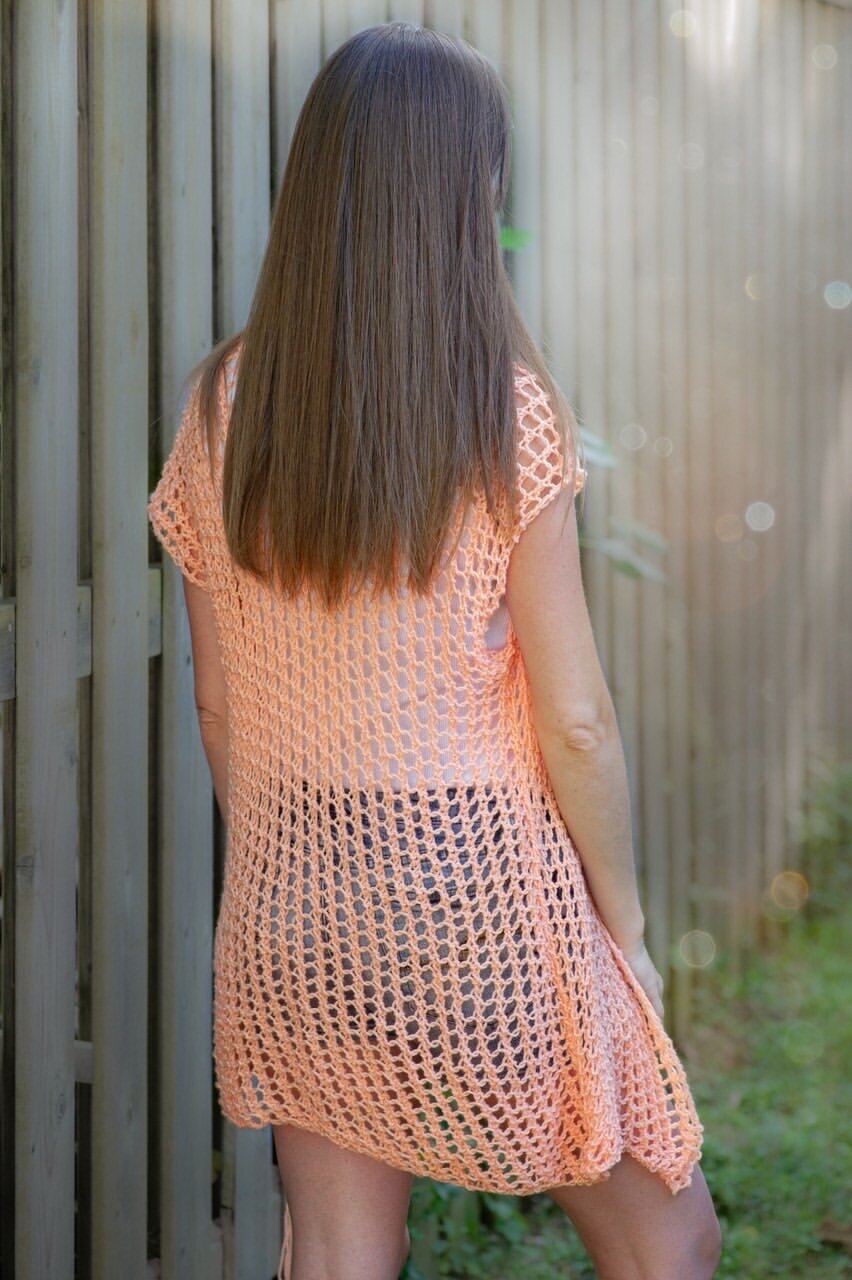
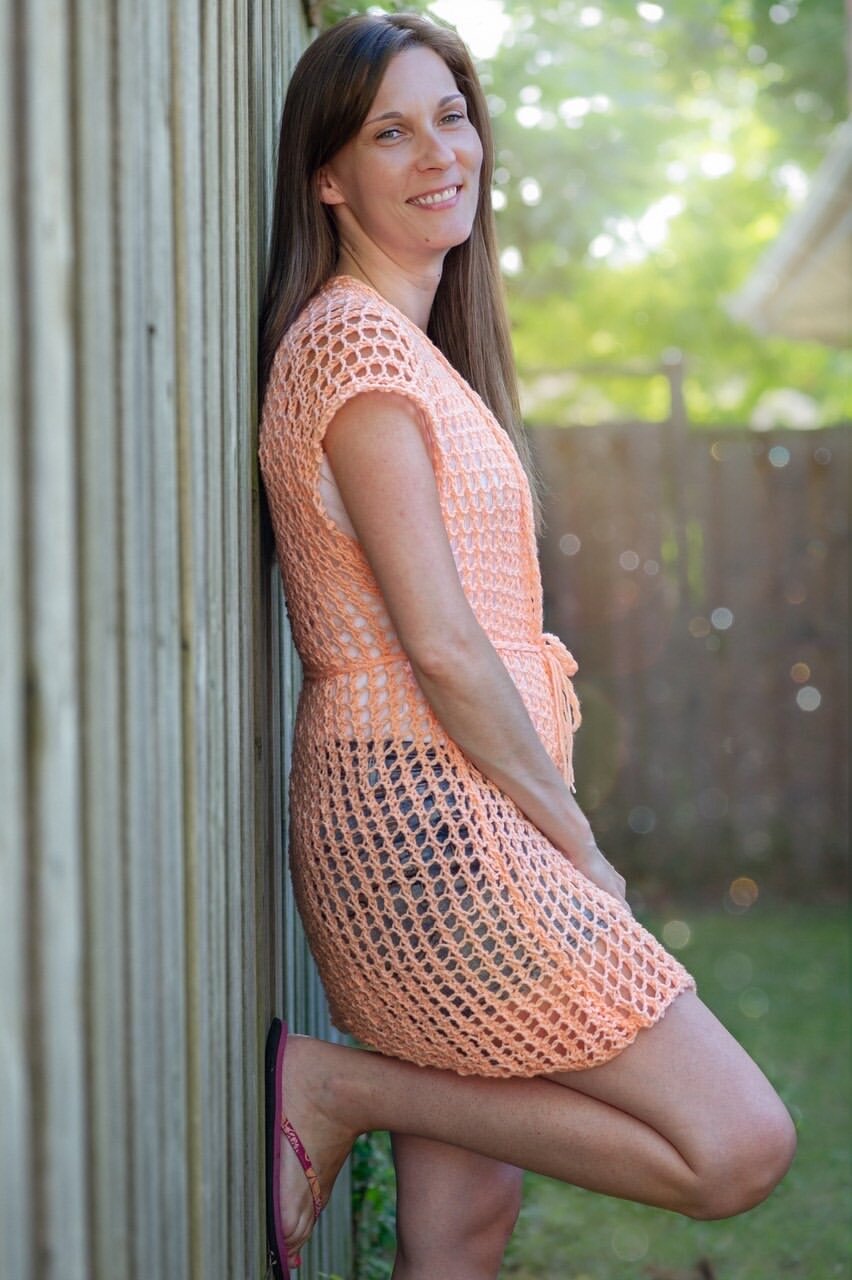
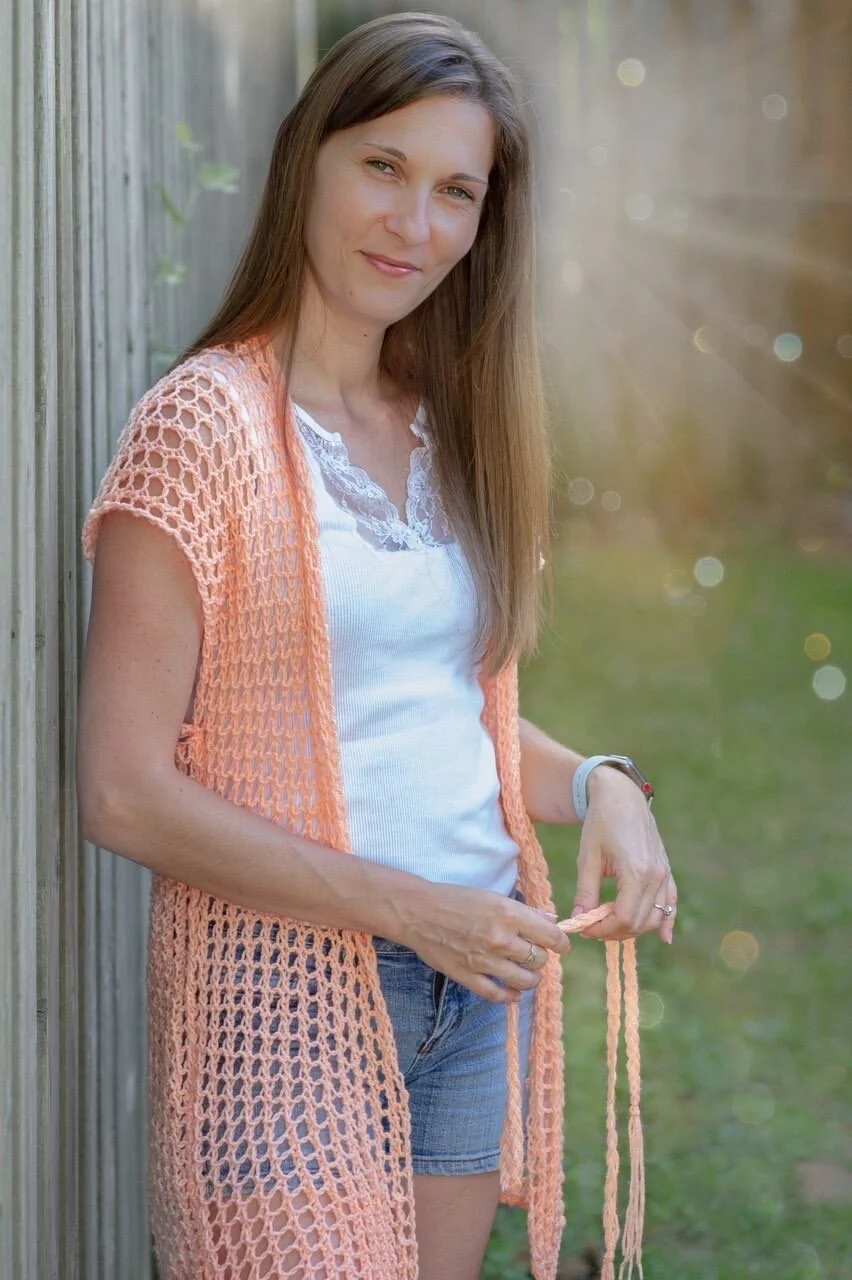
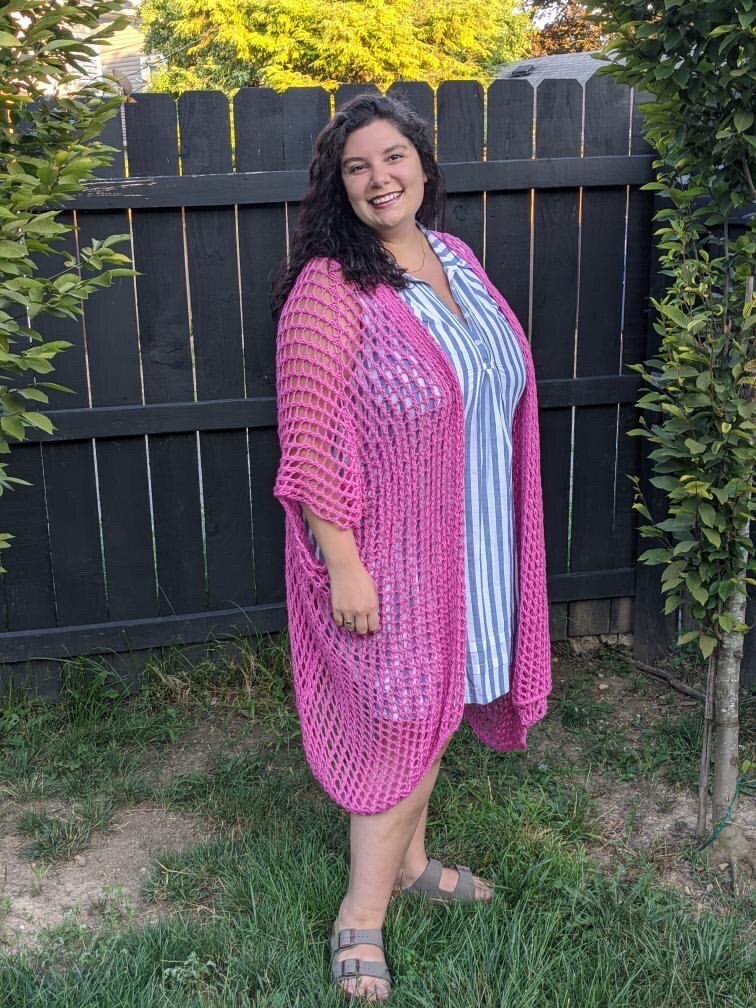
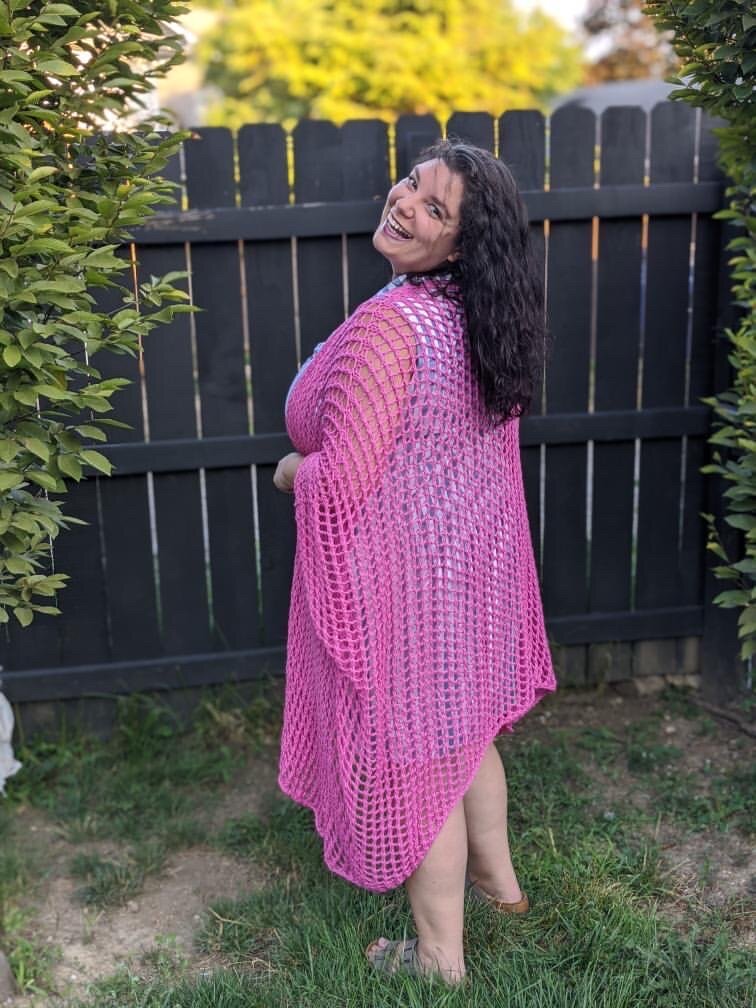
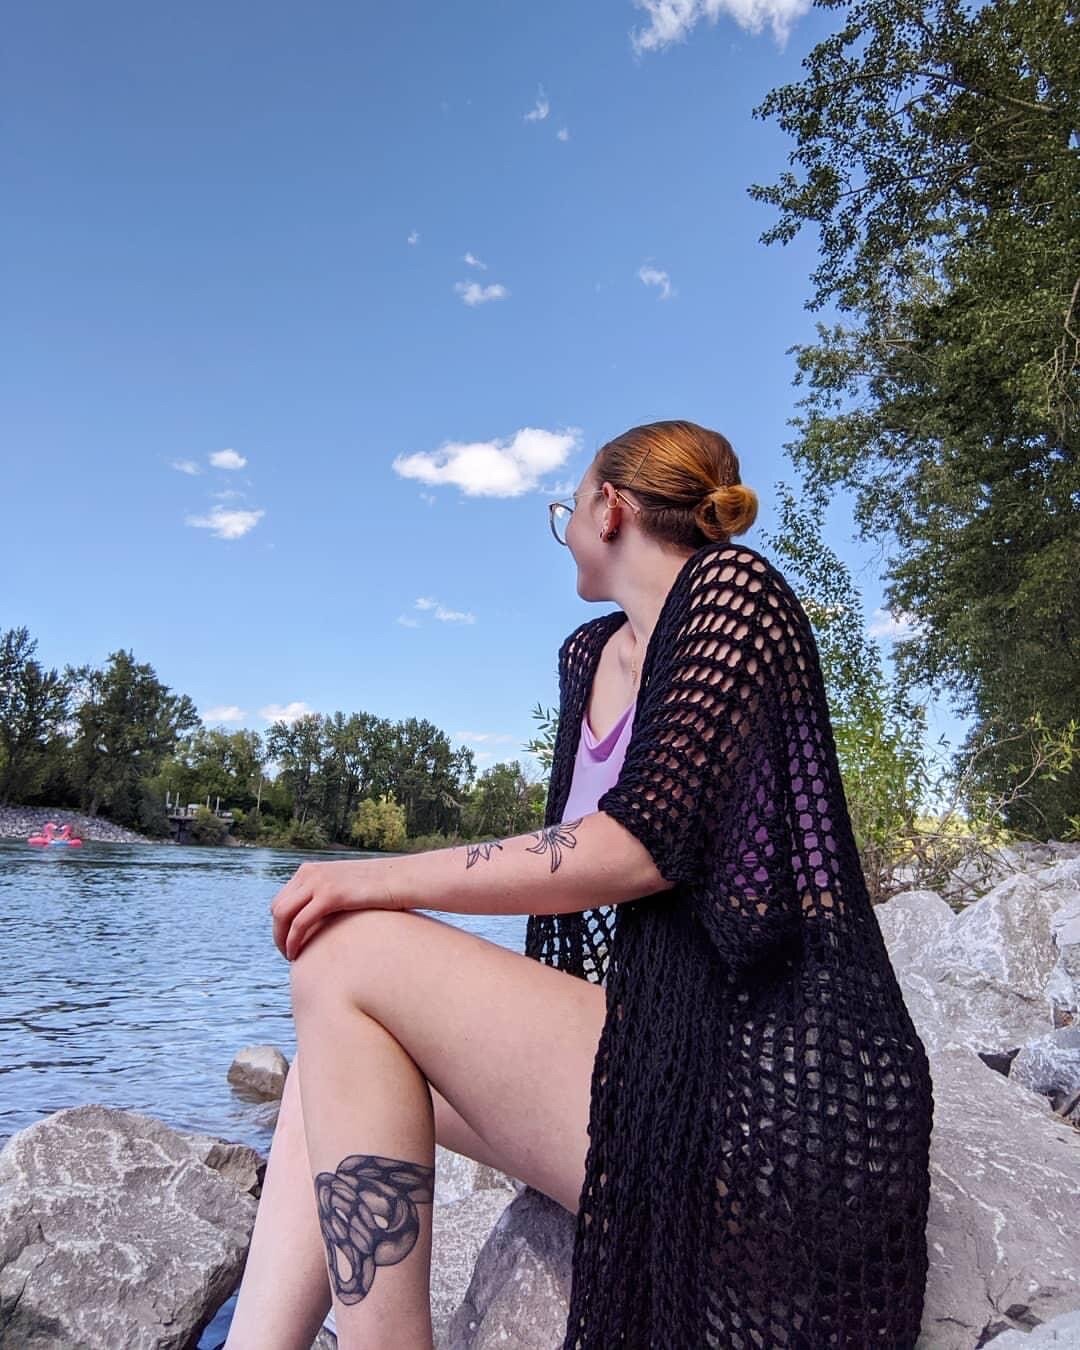
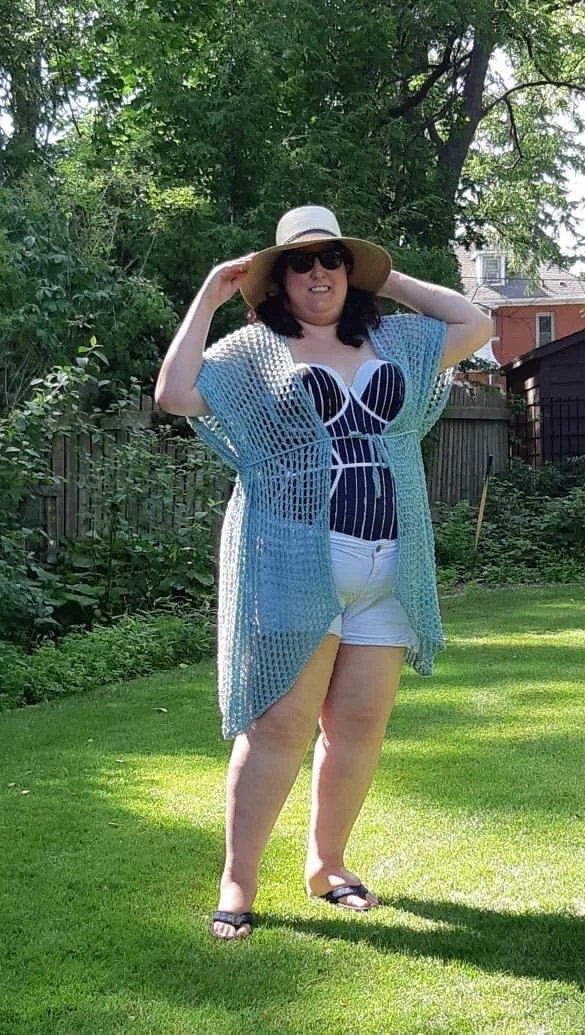
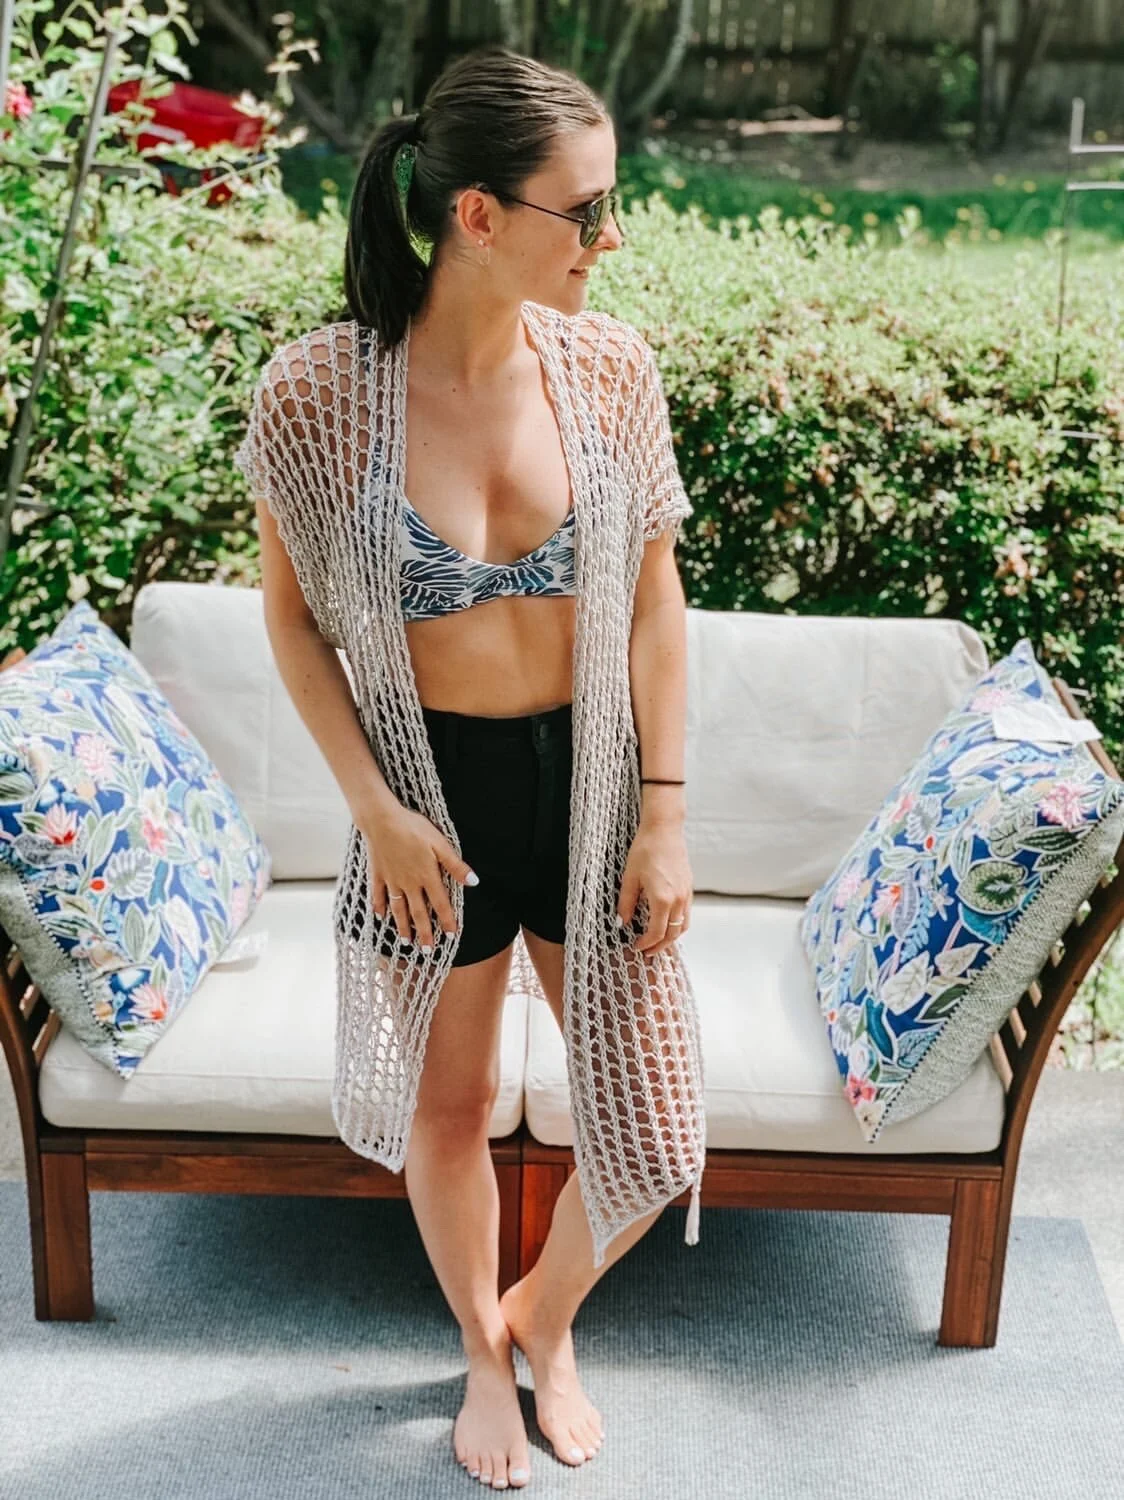
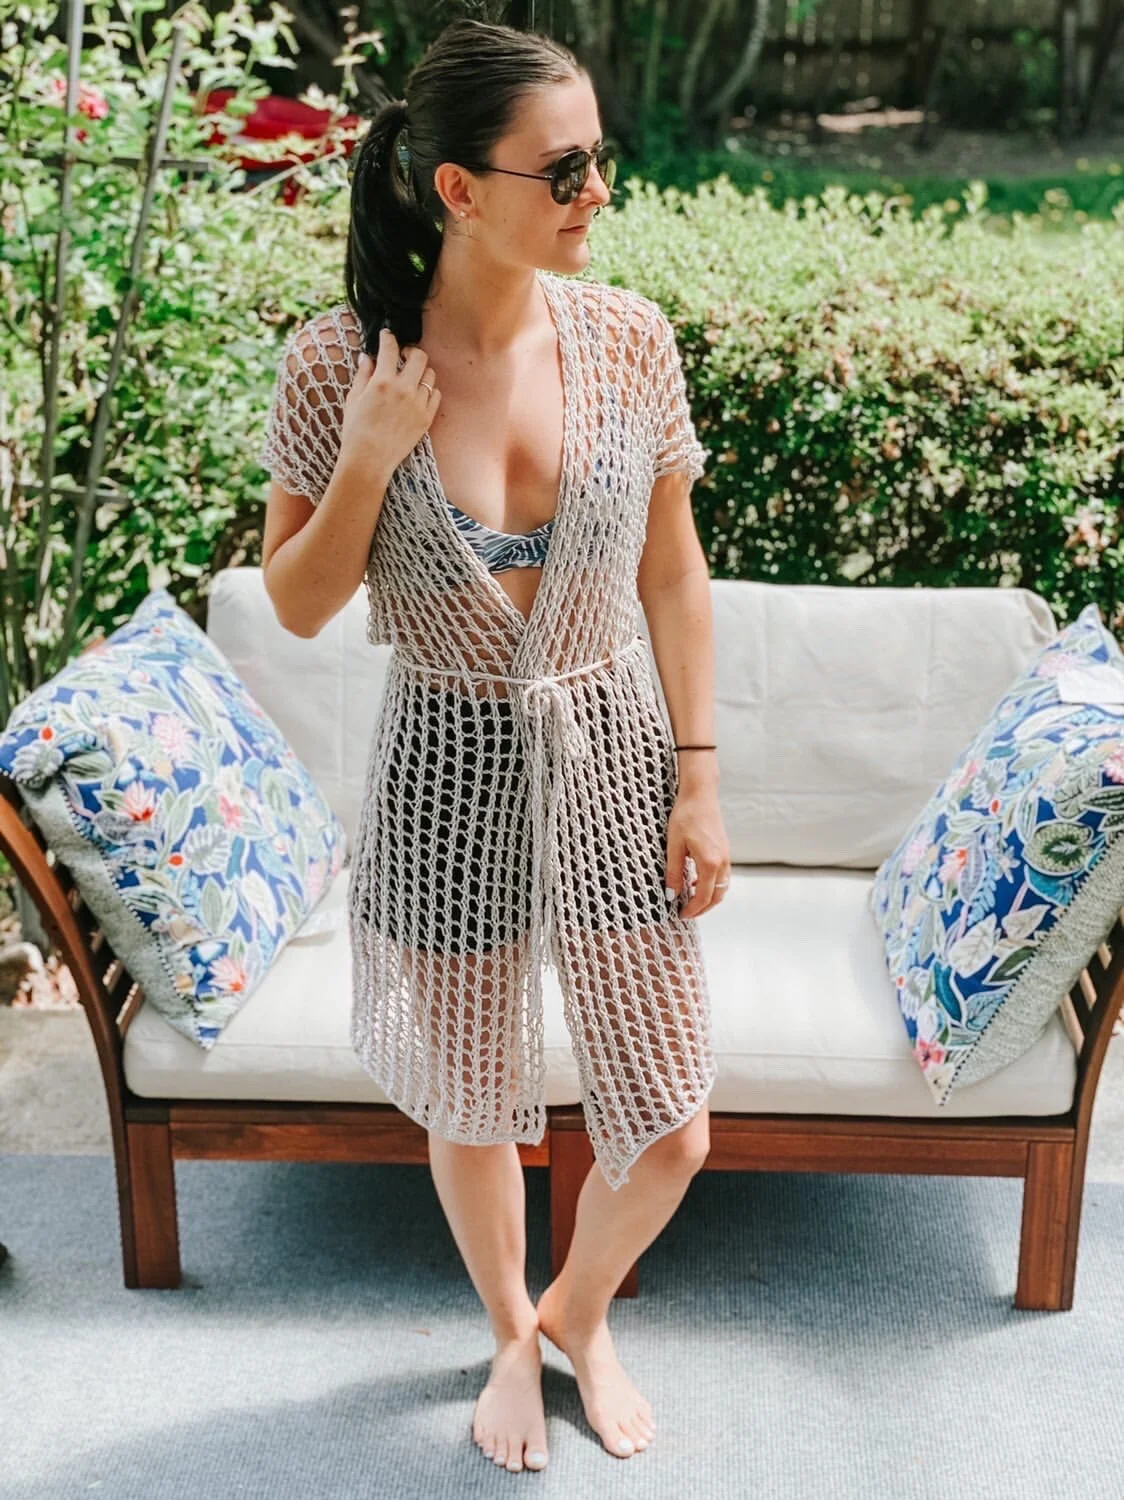
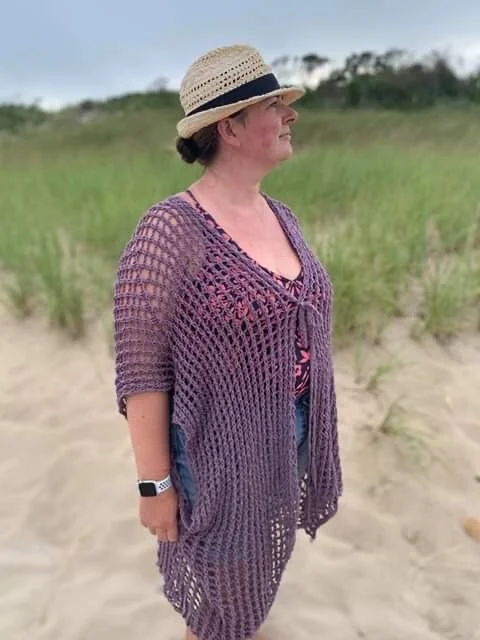
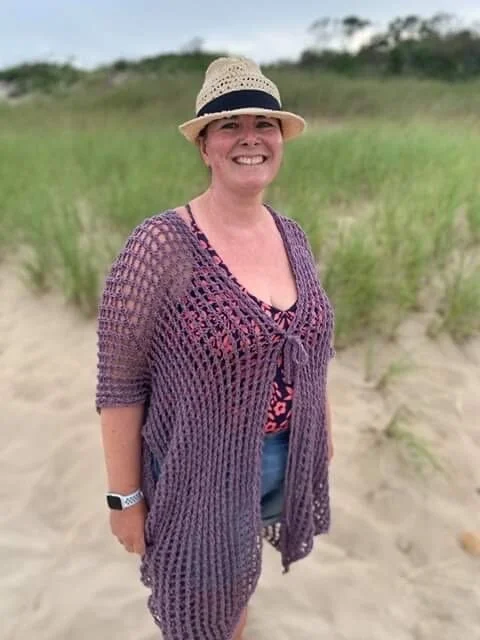
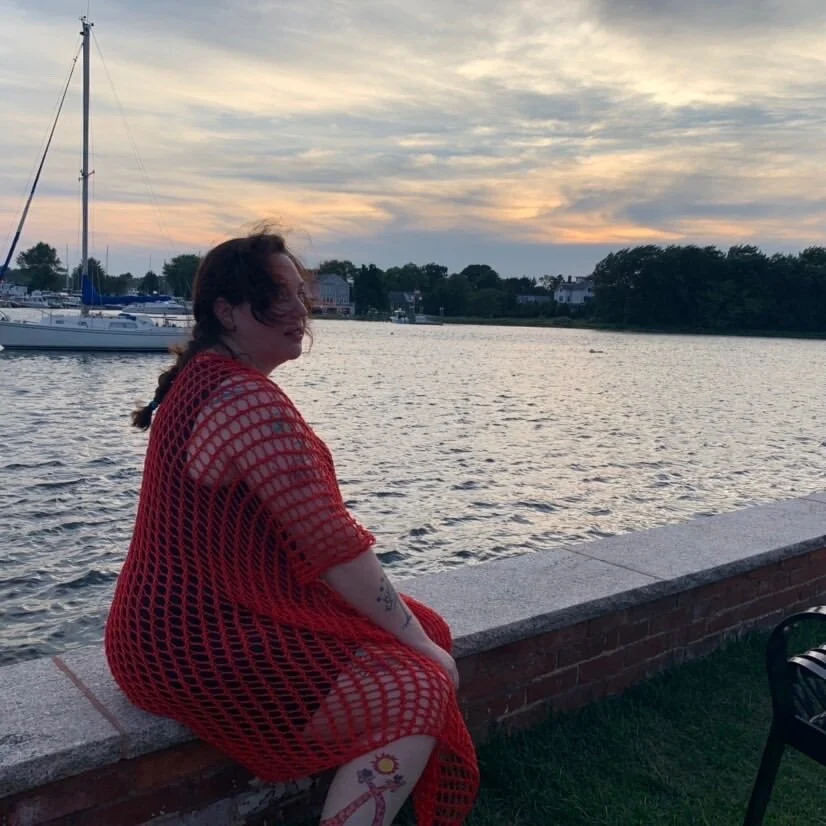
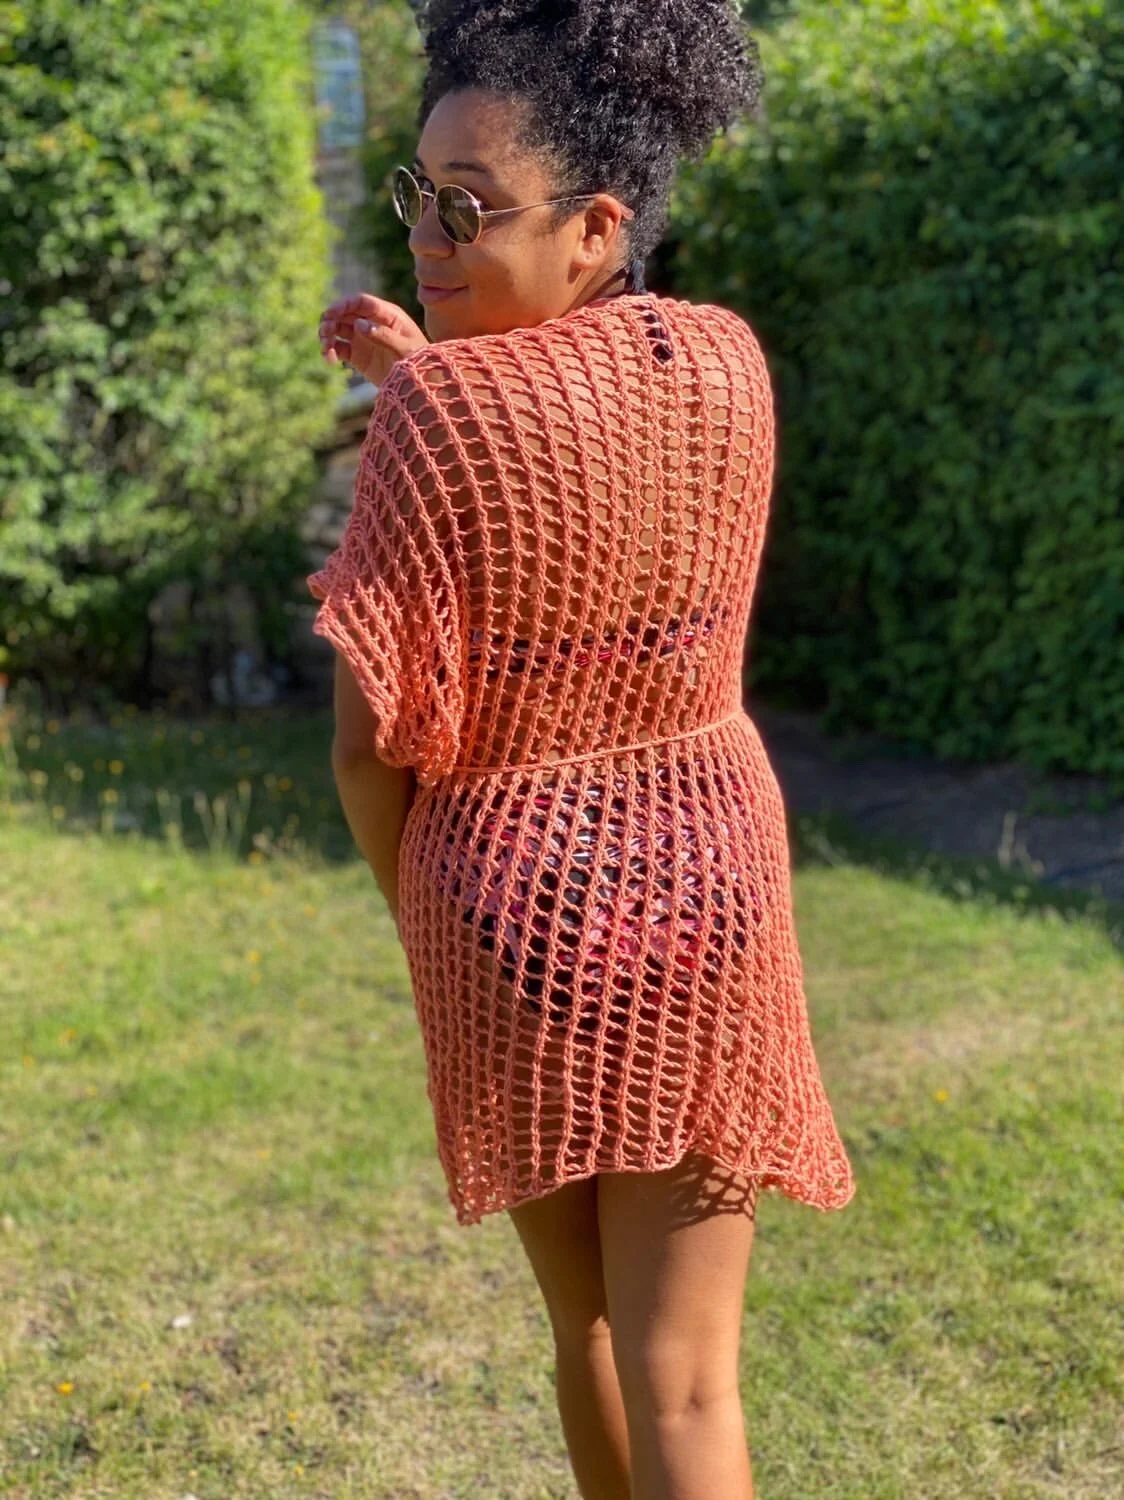
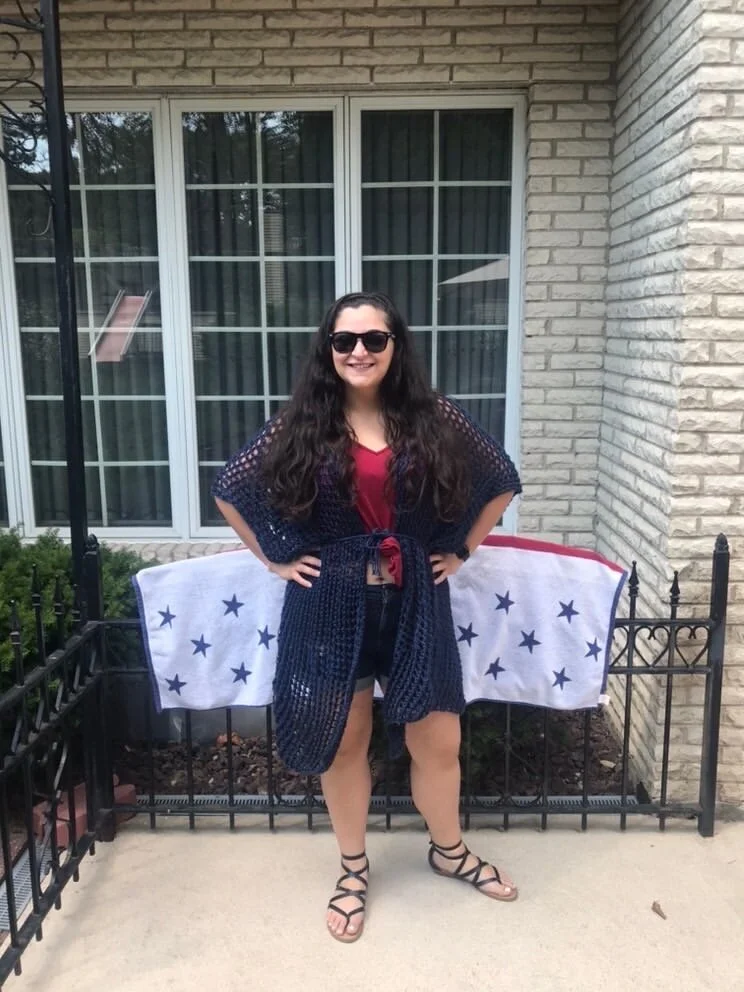
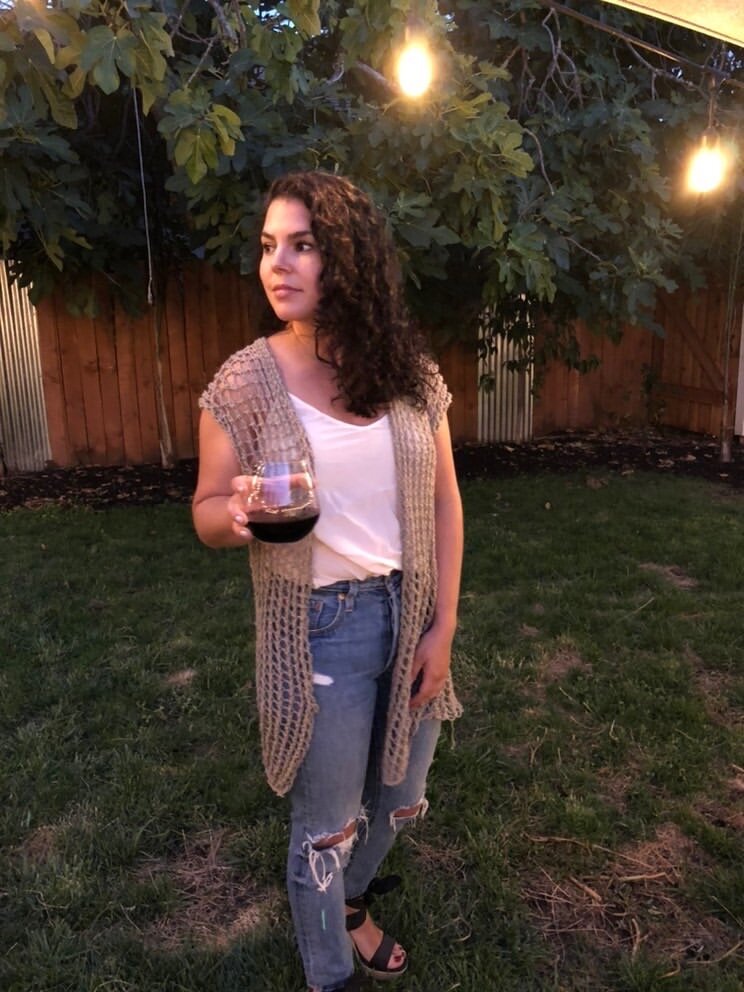
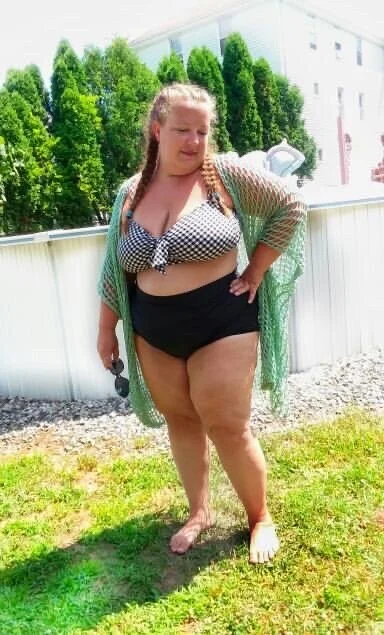
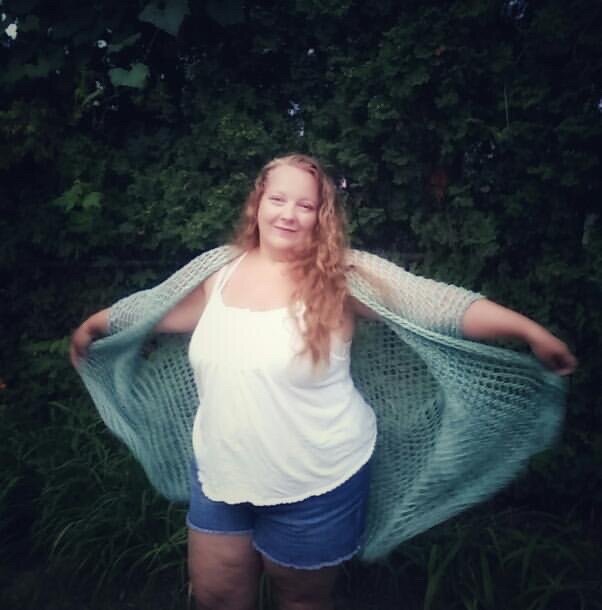
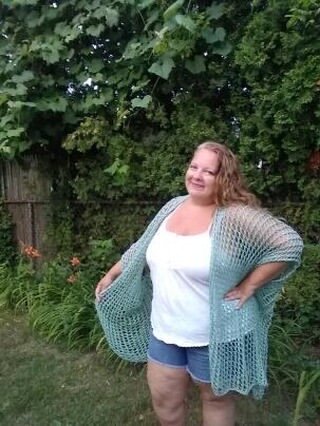
“I can’t believe that’s not crochet!” Yup! It’s knit - I promise.
It’s summer and that means it’s time to hit the beach. With knit swimsuit cover-ups, lacy crochet ruanas, and knit boho beach wraps popping up everywhere, I wanted to make my own! Now let’s be honest, Calgary, Alberta, Canada is a little landlocked (aka VERY), but while I don’t have the ocean beside me to spray the sea-salt into my hair and nail those beachy waves, I do… have a few fresh water lakes here and there *wink*. One of them is where my family cabin is located; Gull Lake. So that’s what inspired the Lakeside Beach Wrap - though come think of it… the road our cabin is on is really called “Lake Shore Drive”.
THE DOWNSIDE OF KNIT
I find certain fiber crafts get the better of one thing over the other and this hit hard when I was trying to come up with the Lakeside Beach Wrap knitting pattern. Crochet is great for circles and round shapes. Knitting is not. Knitting is great for smooth cables. Crochet is not. And while crochet is great for making lacy pieces with simple stitches, knitting lacks this - unless you’re ready for 2-6 steps in one stitch. Which leads me to my next struggle: How do you make a beach wrap/swimsuit cover-up that is beginner-friendly, looks lace, is cute but is knit?

FINDING THE PERFECT STITCHES
I can tell you that trying to find a lace stitch that comes in short multiples, has less than a 6-row repeat, and where you don’t have to write it like hieroglyphs with a bazillion steps per stitch in knitting… is no easy feat. I knew there was one off the top of my head, but my thought to myself was “that’s too simple Chantal - everyone knows how to do that”. So I scoured and scoured, and gauge swatched and gauge swatched. I kept coming up against obstacles. Too dense. Too many steps. Whoah, that is hard for me, imagine for a beginner. Nope. Nope. Nope. None compared to the original one I was thinking of. So I threw in the towel and just started. Boy - am I glad that I did.
THE EASIEST LACE YOU EVER DID SEE
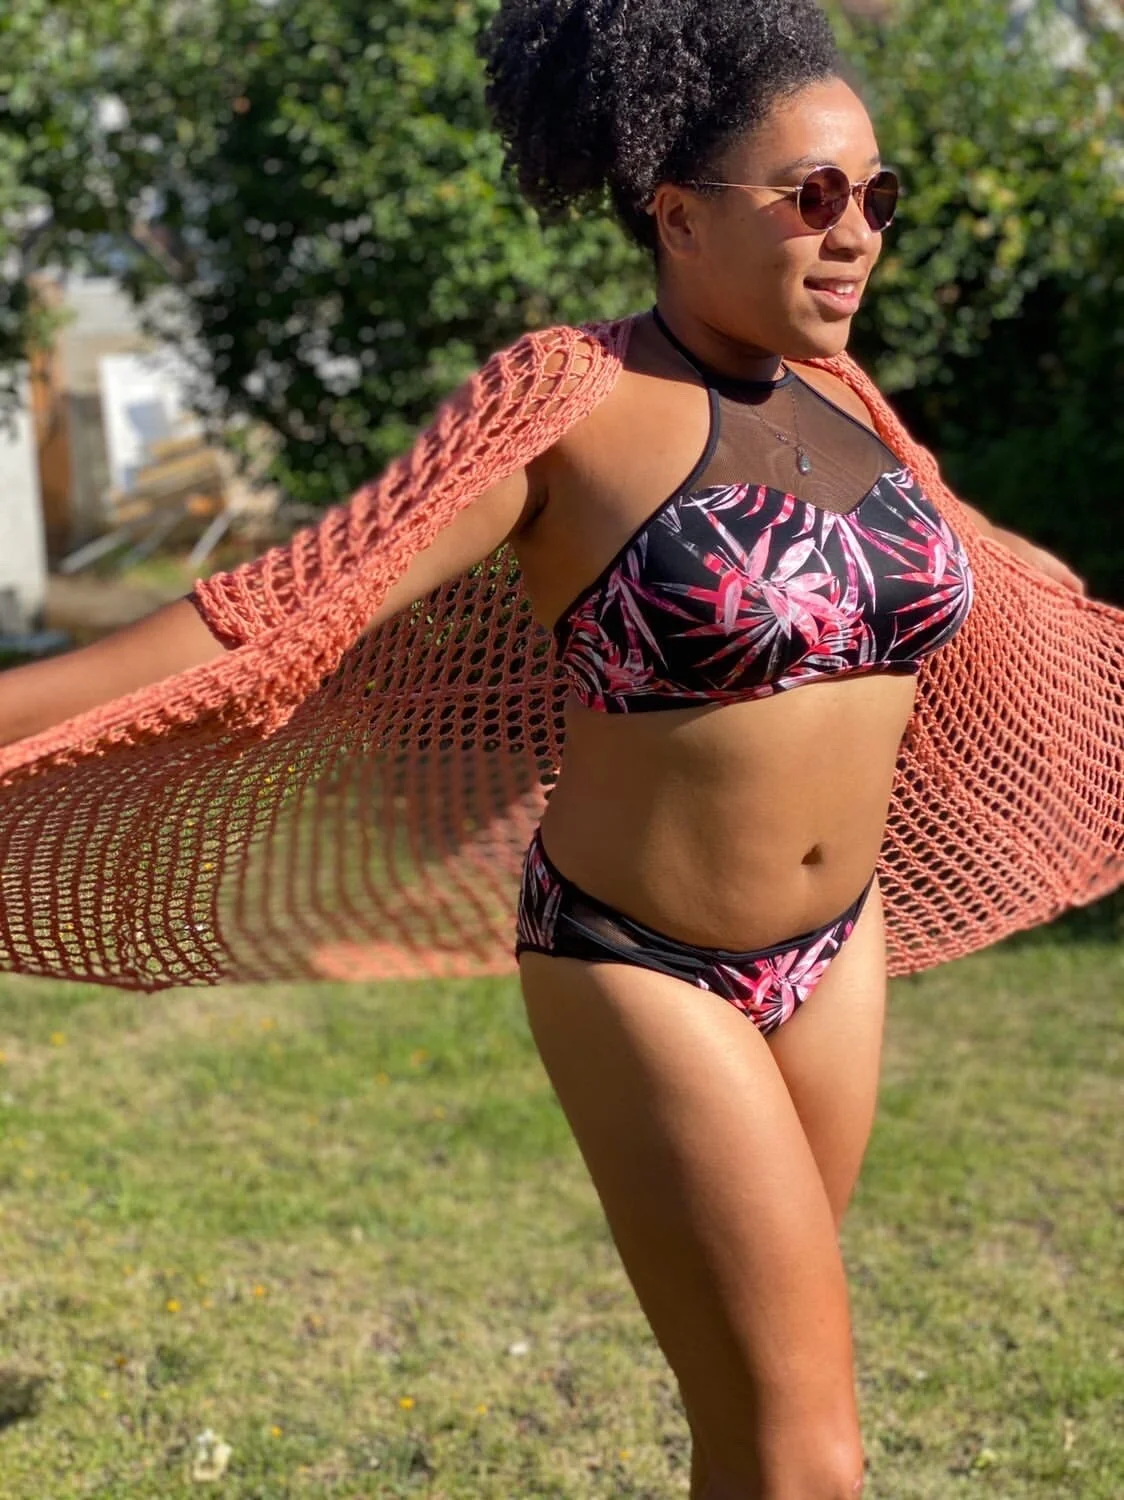
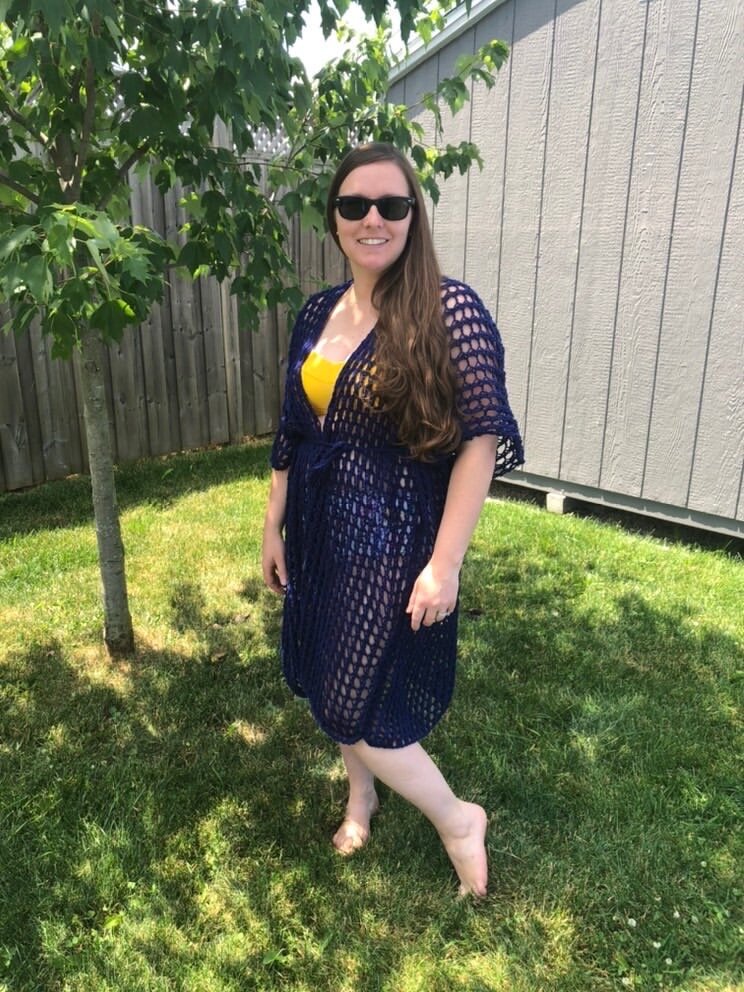
Welcome the K2tog, the SSK and the YO. Two simple decreases and one simple increase. Bring them together, and you get lacy gorgeous stitches perfect for a knit wrap to pair with a swimsuit. And that’s exactly what you’ll find in the Lakeside Beach Wrap. This pattern is a two-row repeat. Meaning you’ll remember this pattern before you know it and keep trucking! The end result is a gorgeous, flowy and drapetastic knit beach cover-up that everyone will stare at wide-eyed when you tell them you made it.
CHOOSING A YARN
When I first thought up this knit swimsuit cover up, I was working on the Girls Best friend Blanket and using Lion Brand Cobblestone. This yarn is 100% acrylic and it’s extremely bouncy. The dual coloured strands that make it heather really do give it a light and airy spring, letting me know that the drape alone was going to be gorgeous when knit up with a looser gauge. I debated on going with cotton, but I was worried that cotton may stretch too much, which is correct, as I had two testers use cotton and they both said that they would prefer doing less repeats in the pattern to accommodate. So just note this as you go to make yours!
Alrighty, let’s get started!
PIN IT FOR LATER
BUY THE AD-FREE PDF PATTERN ON RAVELRY
BUY THE AD-FREE PDF PATTERN ON ETSY
BUY THIS AS A KIT ON LIONBRAND.COM

LAKESIDE BEACH WRAP
DIFFICULTY LEVEL: Advanced Beginner.
You will need to know how to cast on, knit, purl, K2tog, SSK, YO, KFB, work flat, bind off, seam.
DESCRIPTION
I can't believe it's not crochet! The Lakeside Beach Wrap is drapey, has some heavenly flow, and is perfect to wear to the beach or to a backyard BBQ (whenever we can have those again!). Made with larger needles and a beautifully springy acrylic worsted yarn, this lacy number works up quickly with an easy 2-row repeat. Know how to YO, K2tog, knit, and purl? Then you, my friend can do this pattern!
NOTES
This wrap is worked in one piece. You will start knitting the full back section flat, then split at the shoulders and work one panel from the top of the shoulder, down to the hem. Once finished the first front panel you will pick up the second front panel at the top, and work it from the shoulder down to the hem as well. Finally, you will seam up the sides.
This pattern uses straight needles. Though the stitches may be a bit squishy, it’s helpful for when knitting each row as the YOs can shift or catch on the cord of circular needles. That being said, use whichever tools you prefer. I also suggest putting in lifelines throughout your piece, as it can be difficult to rip back should you make a mistake.
SIZES
This pattern is written for sizes XS/S (M/L, XL/2XL, 3XL/4XL) and has 18-20" of positive ease, meaning it is very flowy and oversized. Be sure to follow the correct size throughout. Highlighting or circling the instructions for the size you're following is helpful and encouraged. This pattern does have instructions on how to add more sizes if you don’t find your size below.
How to choose your size: Find your bust measurements below. Positive ease is built into the pattern, meaning final measurements are 14-20” more than that number.
XS/S – 28-34” bust
M/L – 36-42” bust
XL/2XL – 44-50” bust
3XL/4XL – 52-58” bust
Pattern has been tested in all sizes.

CHECK OUT MORE OF MY KNITTING PATTERNS HERE.
PIN THIS PATTERN TO YOUR PINTEREST BOARDS FOR LATER HERE.
ADD THIS PATTERN TO YOUR RAVELRY QUEUE HERE.
PURCHASE THIS AS A KIT ON LION BRAND HERE.
Want to manipulate this pattern to fit your size?
This pattern is easily manipulated to fit larger or smaller bust sizes. Sizes can be added in 7” measurements.
For a smaller size, Take the original cast on number of the smallest size and subtract the amount of CO sts in multiples of 16. This will eliminate 7 inches in width in your fabric. These stitches can then be taken out evenly throughout your front panels.
For a larger size, Take the original cast on number of the largest size and add the amount of CO sts in multiples of 16. This will add 7 inches in width in your fabric. These stitches can then be evenly distributed throughout your front panels.
Want it shorter or longer? Decreasing the number of rows, or adding additional rows in the body section will eliminate or add length to your desire. Remember to increase or decrease the same amount of rows in the back panel, as the front panels. Note: more rows will increase the yardage needed..
MATERIALS
•3 (XS/S, M/L), 4 (XL/2XL), 5 (3XL/4XL) balls of Lion Brand Cobblestone or approximately 425m/465yrds – 823m/900yrds of another worsted weight yarn, category 4
•Size US15/10mm straight needles
•Darning needle
•Scissors
•10-15 Locking stitch markers (optional)
GAUGE
Knit in stockinette flat on US15/10mm needles unblocked: 12 stitches x 12 rows = 4”/10cm
Knit in stockinette flat on US15/10mm needles blocked: 9 stitches x 10 rows = 4”/10cm
ABBREVIATIONS
CO = Cast On
K = Knit
P = Purl
Sts = Stitches
RS = Right Side
WS = Wrong Side
K2tog = Knit Two Together
YO = Yarn Over
SSK = Slip Slip Knit
KFB = Knit Front Back
BO = Bind Off

PATTERN
BACK
On US 15/10mm needles, loosely CO 53 (69, 85, 101) sts
R1: K1, *YO, K2tog, repeat from * until the end of row
R2: P all sts
Repeat R1-2 an additional 10 times, for a total of 11 times
R3: K1, *YO, SSK, repeat from * until the end of row
R4: P all sts
Repeat R3-4 an additional 9 (9, 10, 10) times, for a total of 10 (10, 11, 11) times
Repeat R1-2 an additional 11 times
Repeat R3-4 an additional 10 (10, 11, 11) times
Repeat R1-2 an additional 5 (5, 5, 6) times
R5: K all sts
R6: K26 (34, 42, 50), KFB, K the remaining sts. You will have 54 (70, 86, 102) sts. This garter stitch line signifies your shoulder seam and is where the piece will lie directly on your shoulders.
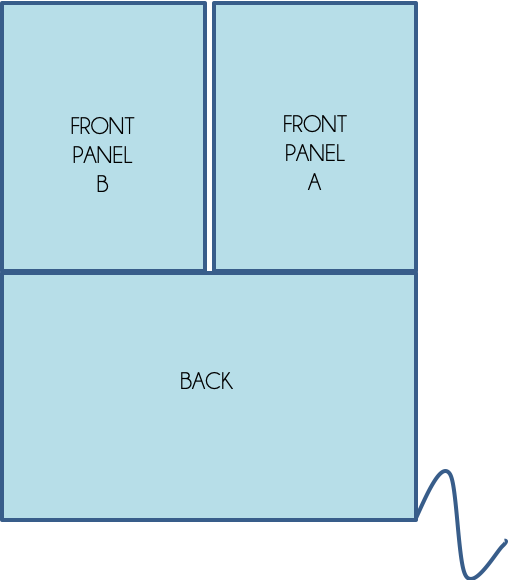
SPLIT FOR YOUR FRONT PANELS
You have now finished knitting the back piece and will be knitting the front panels next. Working the first half of stitches for the front panel (in the next section), you will place the other half on hold (I suggest scrap yarn) and ignore them. You will come back to them to work the left front panel (as if being worn and looking down). Your piece will look like the above once finished.

RIGHT FRONT PANEL A
Starting on the RS:
R1: K1, *YO, K2tog, repeat from * until you have 27 (35, 43, 51) sts on your right needle, turn work (You can now place the remaining unworked stitches on hold for later. They are your left front panel B.)
R2: P all sts
Repeat R1-2 an additional 4 (4, 4, 5) times, for a total of 5 (5, 5, 6) times
R3: K1, *YO, SSK, repeat from * until the end of row
R4: P all sts
Repeat R3-4 an additional 9 (9, 10, 10) times, for a total of 10 (10, 11, 11) times
Repeat R1-2 an additional 11 times
Repeat R3-4 an additional 10 (10, 11, 11) times
Repeat R1-2 an additional 11 times
Loosely BO all sts. Cut your working yarn and weave in end.
LEFT FRONT PANEL B
With new working yarn, you will start to work the stitches that were put on hold, starting on the RS:
R1: K1, *YO, K2tog, repeat from * until the end of row
R2: P all sts
Repeat R1-2 an additional 4 (4, 4, 5) times, for a total of 5 (5, 5, 6) times
R3: K1, *YO, SSK, repeat from * until the end of row
R4: P all sts
Repeat R3-4 an additional 9 (9, 10, 10) times, for a total of 10 (10, 11, 11) times
Repeat R1-2 an additional 11 times
Repeat R3-4 an additional 10 (10, 11, 11) times
Repeat R1-2 an additional 11 times
Loosely BO all sts. Cut working yarn and weave in end.

BLOCKING
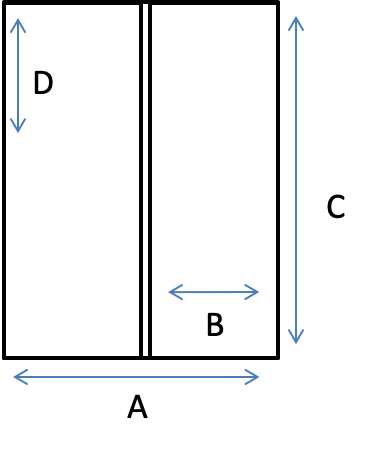
At this point, you will want to block your piece. The YO and K2tog pattern will naturally slant and blocking will be the first step to combat it. Seaming will fix it. So if you’re worried, don’t be! I suggest a steam block, or a wet block to expand those stitches to the blocked gauge of 9 sts x 10 rows. This will ensure you get the final dimensions on page 5. If you are working with cotton, please note that cotton likes to stretch additionally on top of blocking. So keep that in mind.
SEAMING
Turning your piece inside out, place it on a flat surface and line up the sides together by folding the front panels over the back panel. To keep your rows in line I suggest using locking stitch markers to line up the eyelet holes per row every 6-10 rows. Thread your darning needle and with a whip stitch, seam from the bottom, towards the underarm leaving a 9.5 (10.5, 12, 12) inch tall hole for your arm. Repeat on the second side.
BELT
Cut 6 strands of yarn that measure the circumference of your waist, plus 30” inches in length. (To ensure they are the same length, I would advise steam blocking them as well.) Make a knot at one end leaving roughly 1-2 inches on the end for a tassel, and loosely 3-strand braid the belt (2 pieces of yarn per strand), and knot it at the other side, leaving 1-2 inches for the second tassel. Brush out and separate the strands to create a fuller tassel.
FINISHING YOUR PIECE
You’re almost there! Now weave in your ends and put it on! Do a happy dance because you just finished your #LakesideBeachWrap and you look fierce!
Should you have ANY questions please send them to me at knitatude@gmail.com. Feel free to use the #LakesideBeachWrap hashtag and send and tag Knitatude in any photos of your works in progress and finished pieces. I love showing you guys off on my social media feeds!
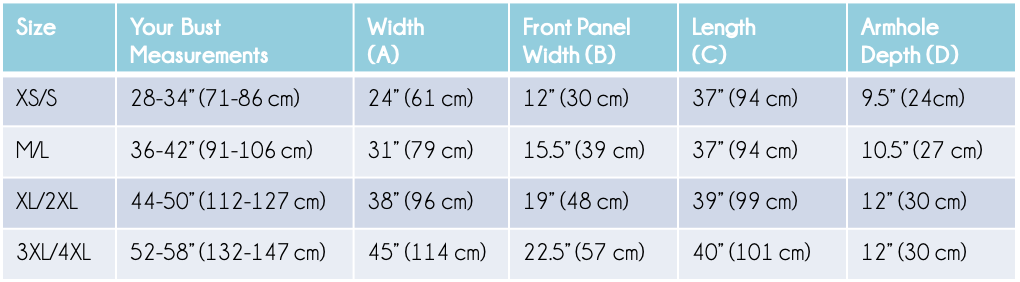
FINAL DIMENSIONS (Blocked)
POLICIES
This pattern is a copyright of Chantal Miyagishima of Knitatude. Lakeside Beach Wraps created using this pattern may be sold in small quantities (less than 10 total) with written consent first given by Chantal Miyagishima of Knitatude. Credit must be given to Knitatude / knitatude.etsy.com. Pattern and photos can not be used for resale purposes. Please share your work with the hashtag #LakesideBeachWrap and #knitatudeknits to share the handmade love.
MY TESTERS


FINAL YARDAGES
XS/S: 421-440 yards
M/L: 528-650 yards
XL/2XL: 678-787 yards
3XL/4XL: 820-970 yards
YARNS USED
Lion Brand Cobblestone
Lion Brand Low Tide
Lion Brand 24-7 Cotton
Paintbox Simply DK
Caron Cotton Cakes
Caron One Pound of Love
Caron Simply Soft
Cascade 220 Superwash Merino
Loops N Threads Creme Cotton
Malabrigo Verano
Red Heart Super Saver
Rowan Softknit Cotton
We Are Knitters Pima Cotton
